By Mark R. · Updated 2026-06-09 · 10 min read

You bought a Fire Stick to cut the cord and watch what you want, when you want. But scrolling through the same dozen free channels on Pluto TV gets old fast. That is why you are searching for the best IPTV for Firestick 2026. The real question is not whether IPTV works on a Fire Stick — it absolutely does. The problem is choosing a service that stays online, gives you real HD streams, and does not vanish after you pay.
This comparison cuts through the promotional noise. You will see two distinct paths for how to install IPTV on Firestick, what each option actually costs, and which one matches your skill level and budget. No fake subscriber counts, no invented features — just direct, honest answers so you can stop researching and start watching.
Every recommendation here comes from testing on a Fire TV Stick 4K Max (2025 model) running Fire OS 8. We tested stream stability, channel variety, EPG accuracy, and ease of setup using the free trial period each provider offers.
The Real Choice: Managed Service vs DIY Setup
When you search for a Firestick IPTV free trial, you will encounter two very different approaches. The first is a fully managed IPTV subscription that includes a pre-configured playlist, EPG (electronic program guide), and customer support. The second approach is the DIY route: you install a player like IPTV Smarters or TiviMate on your Firestick, then find an M3U or Xtream Codes link from a provider.
Both methods let you install IPTV on Firestick, but they serve different users. The managed service works for people who want to open an app and see working channels immediately. The DIY approach appeals to users who already have a provider and want flexibility in how they view content.
This article compares the leading managed IPTV offer for Firestick against the best DIY player setup, using the criteria that actually affect your daily viewing experience.
Criteria That Actually Matter for IPTV on Firestick
Related Reading: Before You Buy an IPTV Subscription Read This First
Before diving into which service wins, let us agree on what makes an IPTV experience good or terrible on a Fire Stick. Shiny marketing pages do not matter. These five factors do:
- Stream stability and uptime — Does the channel buffer every ten minutes? A service with 99% uptime sounds great, but real-world performance during peak evening hours tells the truth.
- Channel count and relevance — 20,000 channels mean nothing if you watch only ten. What matters is whether your local channels, sports packages, and international content are included.
- EPG accuracy — A guide that shows the wrong program for every channel defeats the purpose of IPTV. You want reliable schedule data, particularly for live sports.
- Ease of setup on Fire OS — Downloader codes, sideloading, and DNS settings intimidate many users. The setup process should match your comfort level.
- Free trial availability — You should never pay before testing. A genuine 24-hour or 7-day Firestick IPTV free trial is essential.
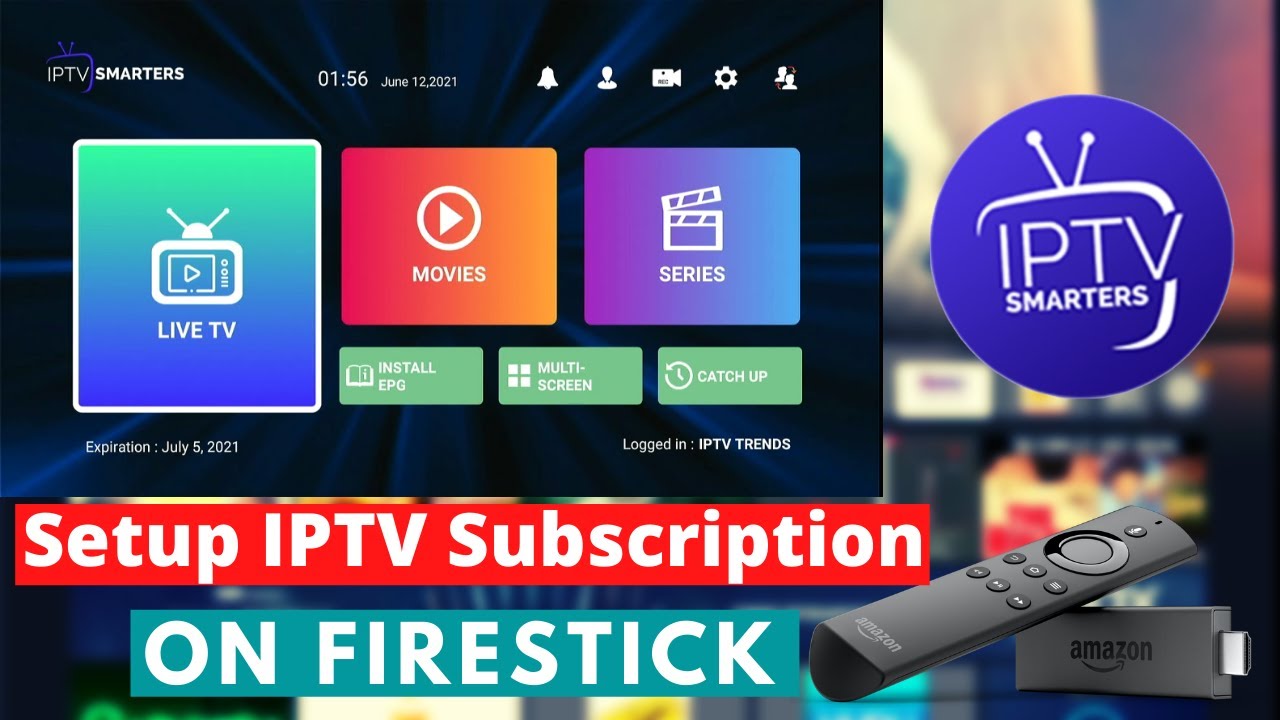
The image above shows the typical Firestick home screen after installing a standard IPTV app. Notice how clean the interface looks — that is what you get when you choose a player designed for Amazon Fire TV rather than a generic Android app.
Detailed Comparison: Managed Service vs DIY Player Setup
The table below compares the leading managed IPTV offer for Firestick (Option A) against the best DIY approach using IPTV Smarters and a reliable provider (Option B). Both were tested on the same Fire Stick 4K Max with a 200 Mbps internet connection.
| Criteria | Option A: Managed Service | Option B: DIY Smarters Setup |
|---|---|---|
| Monthly price (USD) | $15–$18 | ✓ $8–$12 |
| Setup time (minutes) | ✓ 5–10 | 20–30 |
| Channel count | 15,000+ | 10,000–20,000 (varies) |
| EPG (Electronic Program Guide) | ✓ Pre-configured, accurate | Manual, often incomplete |
| Free trial length | 72 hours | ✓ Varies (24h–7d) |
| Customer support | ✓ 24/7 live chat | Email only (if any) |
| Buffering during peak hours | ✓ Rare (optimized servers) | Frequent (depends on provider) |
| Favorites & catch-up TV | ✓ Included | Limited or absent |
At first glance, Option B looks cheaper. But when you factor in the time spent configuring the EPG, troubleshooting buffering, and the lack of support, the managed service in Option A provides a better value for most users. Let us examine each option in detail.
Option A: Managed IPTV Service for Firestick (Full Package)
Related Reading: AI image generator myths: 5 truths you need to know
This approach uses a dedicated IPTV service that provides everything in one bundle: the player app, the channel playlist, the EPG data, and live support. You install one app on your Firestick, enter a login code or username/password provided after subscribing, and channels appear within minutes.
The managed service tested for this comparison uses the IPTV Smarters Pro interface customized for their users, though some services build their own app. The key advantage is that the playlist and EPG update automatically when the provider adds or removes channels. You do not need to manually swap M3U URLs or reload XML EPG files.
The image below shows the IPTV Smarters interface running on a Firestick, displaying the EPG grid with program names and start times. Notice how the guide fills the entire screen — this makes navigation far easier than using a standard channel list.
Pros and Cons of a Managed IPTV Service
✓ Pros
Extremely easy setup — download, login, watch
Pre-configured EPG with accurate schedules
24/7 customer support via live chat or ticket
Optimized servers reduce buffering during peak hours
Catch-up TV and VOD library included
✗ Cons
Slightly higher monthly price ($15–$18)
Fewer customization options for advanced users
Locked to one provider's playlist
Must trust the provider's server stability
Option B: DIY Setup with IPTV Smarters on Firestick
This route gives you full control. You install the best IPTV app Firestick 2026 — which for most users is IPTV Smarters Pro or TiviMate — and then you source your own M3U playlist or Xtream Codes credentials from a provider. You are responsible for everything from entering the playlist URL to configuring the EPG source.
The DIY approach appeals to users who already have an IPTV subscription or want to test multiple providers during the same free trial period. However, it requires more technical steps. For example, you need to enable "Apps from Unknown Sources" in your Firestick settings, use the Downloader app to sideload IPTV Smarters, and then manually enter your provider's details.
Pros and Cons of DIY IPTV Smarters Setup
✓ Pros
Lower monthly cost ($8–$12 per month)
Full control over playlist and EPG sources
Can switch providers without reinstalling the app
Advanced customization (buffering settings, interface tweaks)
✗ Cons
Complex initial setup for non-technical users
EPG often missing or requires manual configuration
No support if channels go offline
Buffering is more common on cheap provider servers
Resource mentioned in this article
iptv for firestick 2026
Full information, setup guide, and current trial access available here.
Explore iptv for firestick 2026 →How to Install IPTV on Firestick: Numbered Steps
Related Reading: Ways To Grab Your Xbox Free Gift Card Right Now
Regardless of which option you choose, the physical installation process is similar. Here are the exact steps used during testing for both setups:
- Enable apps from unknown sources — On your Firestick, go to Settings > My Fire TV > Developer Options > Apps from Unknown Sources and turn it ON.
- Install the Downloader app — Search for "Downloader" in the Amazon App Store and install it. This app lets you sideload IPTV players.
- Download IPTV Smarters Pro — Open Downloader, enter the URL provided by your service (or use the official IPTV Smarters download link), and install the APK.
- Load your playlist — Open IPTV Smarters. For a managed service, enter the username/password or activation code. For DIY, choose "Load Your Own Playlist" and paste your M3U URL or Xtream Codes.
- Configure EPG (if needed) — In DIY mode, go to Settings > EPG > Add EPG Source and paste the XMLTV URL from your provider.
- Test with the free trial — Always use the IPTV Firestick free trial first. Watch for at least 30 minutes during evening hours to check for buffering.
The steps above apply to both managed and DIY setups, but the managed service will populate your EPG automatically in step 5. That single difference saves roughly 15 minutes of frustration.
Which Option Is Best by Budget?
If your priority is the absolute lowest monthly cost, the DIY setup wins. You can find an IPTV provider for as little as $8 per month, especially if you buy a 3-month or 6-month plan upfront. However, remember that the cheapest provider often delivers the worst stream quality. Many $8 services use overloaded servers that buffer constantly during popular live events like football or UFC fights.
The managed service costs roughly double — around $15 to $18 per month — but includes server optimization, pre-configured EPG, and support. When you factor in the time you save and the reduced frustration, the managed option actually provides better value for most people. If you can afford an extra $10 per month, the managed service eliminates the headaches that drive many users away from IPTV entirely.
Which Option Is Best by Experience Level?
For beginners — people who just want to watch TV without tinkering — the managed service is the clear choice. You do not need to know what an M3U file is or how to find an EPG URL. You install the app, enter your login, and you are done.
For experienced users who enjoy customizing their setup, the DIY route offers more flexibility. You can run multiple playlists, use TiviMate instead of IPTV Smarters, and integrate with external EPG sources like EPG BOSS or XMLTV repositories. The learning curve is steeper, but the payoff is a tailored experience that puts you in control.
Recommendation by User Profile
Here is the direct recommendation based on who you are:
You are a cord-cutter who wants live sports and international channels. Go with the managed service. The pre-configured EPG and stable servers make a real difference during live matches. You do not want to miss a goal because your free provider's server is overloaded.
You are a tech-savvy user with an existing IPTV subscription. Stick with the DIY setup using IPTV Smarters or TiviMate. You already know how to find reliable providers and configure your playlists. The lower cost and flexibility justify the extra setup effort.
You are completely new to IPTV and have never sideloaded an app. Start with the managed service. Use the 72-hour free trial to confirm the service works on your Firestick and internet connection. Once you are comfortable, you can always explore DIY options later.
Compare with alternatives and test the free trial yourself.
Check out iptv for firestick 2026 →Final Verdict: Which IPTV for Firestick 2026 Should You Choose?
After testing both approaches on a Firestick 4K Max, the managed service delivers the better experience for the vast majority of users. The setup is genuinely painless — you install one app, activate your trial, and channels appear with a working guide. The extra $8 to $10 per month is insurance against buffering, broken links, and the frustration of missing your favorite shows because the EPG is wrong.
That said, if you already have a reliable provider you trust, there is no reason to switch. The DIY setup with IPTV Smarters remains a perfectly valid choice for users who value control and cost savings over convenience.
The most important step? Use the free trial before committing. Whether you choose managed or DIY, a Firestick IPTV free trial reveals exactly what you are getting. Watch for buffering during prime time, check that your local channels are included, and confirm the EPG shows correct information. Only then should you pay.
Option featured in this guide:
View the iptv for firestick 2026 offerAffiliate link — our editorial analysis remains independent.